Showing posts with label Modules. Show all posts

Monday, March 30, 2026

New Addition to the Linekin Bay Module

During the National Narrow Gauge in Pittsburg in 2024, I acquired the schooner Ada Brown from Pete Leach, MMR. Pete scratch-built her.  She is the type of schooner that could have visited the port of Wiscasset, Maine during the life-time of the Wiscasset, Waterville and Farmington Railway. She suffered some minor damage during the trip home, even though I bought a new cardboard box and packed it carefully. The water cask came loose. The port anchor and the anchor chain came unglued. Two eyes for securing sheets for the mainsail boom to the deck came unglued. The main mast stay became unglued. After over a year of procrastination, I made the repairs and it was easier than I thought.

Pete had blocks of ice in an open hatch and crew loading another block of ice. Because I don't have an icehouse on my module, I removed them. I added 2 Preiser figures from their merchant sailors ashore set, # 10352.


  

Sunday, January 23, 2022

Monson Module Construction Progress


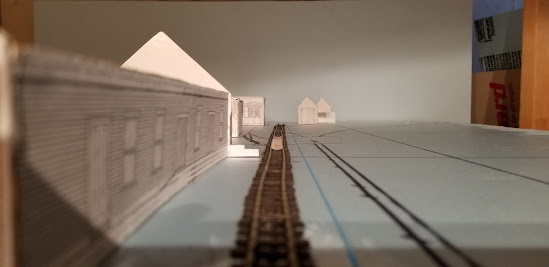
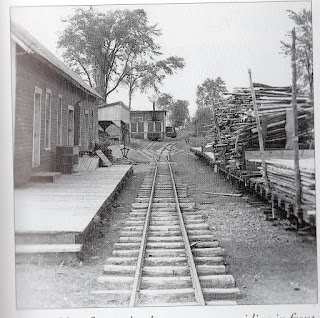
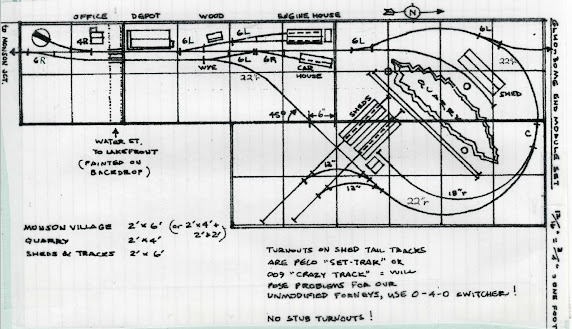
I am pleased with the layout of the buildings and track when compared to a photo of the prototype. The photo is from Two Feet to the Quarries, Robert C Jones, Evergreen Press, 1998 page 101. Tom Hoermann deserves all the credit because he drew the track plan shown below and I am building the foot long module from it that includes the depot, engine house, car house and wood shed. I used his track plan to fit all the buildings onto a four foot long module.

 
Keep in mind that I am compressing a distance of about 515 feet into scale 350 feet. Also note that all of the buildings are full scale. Because I am conforming to HOn30 module standards, the track is straight where it is curved on the prototype.
 
I will be using the following kits:
Hodgdon Company Monson Station
Stevens Creek Wood Shed
Stevens Creek Car House with Tool Shed
 
I will scratch-build the engine house using BEST slate shingles.  
 
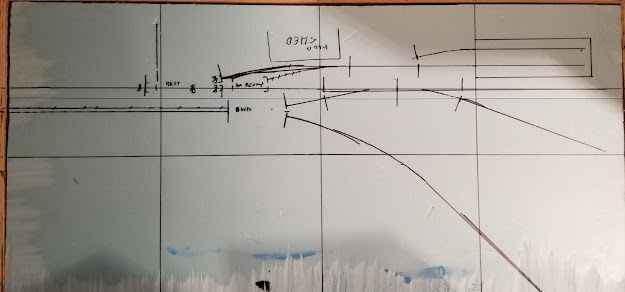
Below is an overhead shot of the track marked on the blue foam of the module.


Wednesday, April 10, 2019

More GLHOn30 Module Photos from the 2019 Midwest Narrow Gauge Show

Here are some pictures of Phil's train running on Jeff's East Dirigo end module of the GLHOn30 Module Group.

Phil scratch-built the gondolas and put Blackstone HOn3 trucks under them. These can easily be narrowed to HOn30 by sliding the wheel toward the center on the axles.

Phil also scratch-built the center cab loco.

I believe the caboose is a Funaro & Camerlengo resin kit.


GLHOn30 Module Photos from the 2019 Midwest Narrow Gauge Show in Boardman, Ohio

I haven't been able to attend this show since 2011 so I really enjoyed it. It was great to see old faces again and catch up. It was also great to see excellent modeling, both narrow and standard gauge. Click on this link (http://www.portlandlocomotiveworks.com/) to see pictures of the show. I would recommend it if you can attend. Gary Kohler and the Portland Locomotive works staff do a great job.

Here are some pictures I took of the Gliebe's Landing module that was part of the Great Lakes HOn30 Module Group that was on display at the show.

Congratulations to Phil, the creator of this module, on winning best in show in the steam locomotive category at this year's show for his HOn30 Shay locomotive. I wish I had taken a picture.


Tuesday, March 22, 2011

Steve Skodzinsky's Monson Village Module

Steve Skodzinsky has graciously allowed me to post pictures he took of his Monson Village module currently being built.

Here are some of Steve's remarks about it:

"The module is 16 inches wide by 96" long. When I was in the planning stages I soon realized that if I was going to use #6 switches, it pretty much follows that the module will be about 8 feet long to accommodate everything. If you used #4 switches you could probably shorten it to 72 to 80 inches or so. In any case, using #6 switches has allowed for very smooth trouble free operation and nice shallow approaches. They can handle just about anything you might ever want to run on a 2 foot empire. "

"I opted for code 55 rail and I purchased #6 switches from LITco. On the advice of Gary Kohler, all but one of the switches are conventional. The switch that leads into the engine house is the one that is the stub. As I have found, it is more work to setup the stub switch. It demands accuracy in placement more than anything. All of the switches are controlled with Blue-Point machines, these have turned out to be very reliable and work great. All of my track is hand laid, I used PC ties about every 6 inches or so to establish gauge and sugarpine and birch-plywood wood ties were used in between. I brush painted all of the ties with Tamiya XF-57 buff paint to approximate the color of the cedar ties that the 2 footers used."

Steve has done a nice weathering job onthe Stevens Creek wood shed.

This will turn out to be a nice module and a good portrayal of the Monson Railroad's station and facilities in Monson, Maine in the early 2oth century. I look forward to seeing the progress and will post pictures here.


Tuesday, September 14, 2010

What's on the Workbench

I am currently working on 2 projects:

The ARU railbus: I have it painted, but not yet decaled or weathered. I am working on painting the driver and passengers, following an article by Sam Swanson (Model Railroader Dec 2005). I will post photos soon.

Track modifications on the Linekin Bay Module: To improve running I have removed the AHM dual gauge crossing and flattened it. The HOn30 leg always had a hump so that the track could reach the height of the standard gauge and this was causing problems for smaller locomotives. The crossing is back in place but needs ballast. At the same time I removed all the track to the right of the crossing all the way to the swing bridge because there were rough spots and widening of the gauge at the swing bridge. I have replaced the bridge track and am weathering new strip wood decking for it prior to securing it back onto the module.

Friday, November 20, 2009

China Module Progress

Here's a shot of one of 2 transition modules that allow the main line on the China module (12" from back drop) to connect to other modules that meet the HOn30 module standard of a main line 6-7/8" from the back drop. The Heki grass mat is coming off and needs to be reglued. The good 3M spray adhesive will be used this time.


Here's the scratch-built China station model that will go on the module. Campbell shingles, Grandt windows and Evergreen styrene clapboard siding was used. Next up to add the Steven's Creek cast metal chimney, paint the roof and build the platform.


The China module at left still has grey Celluclay on the road and next to the team track. Next steps are to paint and texture the road and unloading area next to the team track.

Thursday, January 8, 2009

Another view of the transition module with Linekin Bay in the background. The boards over Linekin Bay are for storage of another module.

Lightweight Module Construction

Here are some photos of a transition module that I have built to transition from the standard 6-7/8" setback from the back drop to a 12" setback. This will be the standard for modules for my home layout. The transition modules will allow the layout modules to conform to the HOn30 standard and be used at meets with the Great Lakes HOn30 Module Group (GLHOn30MG). The 12" setback arose as I found that many of the Wiscasset, Waterville & Farmington Railway station were located on the west side of the tracks and since the defacto GLHOn30MG standard has been right is north the station must sit behind the main line. Because the WW&F ran through rural areas this often leaves a field in the front 2/3 to half of the module. Moving the main line 5 inches forward provides more room for detail such as vehicles, figures etc around the station. My plans for Monson Village and Strong also work better with a 12" set back.
The construction was inspired by Sam Swanson's Windes Inlet module, built mailing from foam core. He has detailed the construction techniques in the latest issue of Light Iron Digest. Construction was done from memory so read the article to learn best practices.

Materials include 1 20" x 30" sheet of 1/2" thick foam core, 6" x 48" x 1/4" poplar, 2' x 2' x 7/8" bead board, aliphatic resin (carpenter's yellow wood glue) or Gorilla Glue.

  • Cut 2 pieces of foam core 6" x 24" for the front and the back with a sharp utility knife and a framing square, making cuts with 3 or 4 passes . Try to make the cut edges as square as possible so that the pieces mate well for gluing and the frame will be easier to keep square. Cut 1/2 of the foam and paper surface from the end of each front and back piece to from a "rabbet" of sorts, leaving the paper on one side intact. The poplar ends will be glued into this rabbet.
  • Next cut 2 pieces of foam core 23" x 4" for the center bead board support.
  • Cut 4 pieces of foam core 4.5" x 6" for corner blocks.
  • Cut 2 small strips of foam core at least 12" long as supports for the top surface.
  • Cut 4 square pieces of foam core about 4" x 4" as supports for the center bead board support.
  • Cut the poplar into 2 24" long pieces for the ends.
  • I waited to cut the bead board until I could them them to fit the less-than-square frame.
  • Draw a line on the inside of the front and back foam core panels parallel and 7/8" away from the top edge to mark the space that the bead board will fill. All supports must stay below this line.Draw the same lines on the poplar ends.
  • Glue the 4.5" x 6" corner blocks to the ends of the front and back foam cores panels keeping them below the 7/8" line.
  • Glue the 2 23" x 4" center support pieces into a "T" beam.
  • After the front and back panel assembly have dried glue each to a poplar end using a framing square to keep them square.
  • After the glue has dried, glue the two end/side assemblies together to form the complete frame (looks like a box).
  • After the glue has cured, glue the center foam support in the middle of the frame running from front to back and below the 7/8" line but flush with it.
  • Glue the long foam core strips on the inside of each poplar end, below and flush with the 7/8" line.
  • After the glue has dried place the bead board into one corner of the top of the frame, mark it to fit inside the frame and cut it. Dry fit it and trim if needed. The bead board should fit into the frame so that the surface is flush with the top edges of the frame.
  • Glue the bead board into the frame using Liquid Nails for Foam Board or latex adhesive caulk. I used the caulk because I've used it before to glue down Woodland Scenics foam track bed.
Now the module is ready for track wiring and scenery. My module weight about 3.5 pounds without track, wiring and scenery.

Sunday, September 14, 2008

Brian's New End Module

Here are pictures of my friend Brian's new Hon30 module. It will serve as one of two end modules so that our group can run a loop.

This is a work in progress so that's why the stones for the retaining wall on the left side are still white. They will be painted.
The white spot in the gravel pit is wet gloss medium that will be water when dry. The trestles still need to be built. This module conforms to the HOn30 module standards listed on the HOn30 mail car site.

As always, click on the pictures for a larger version of each photo.

Tuesday, April 8, 2008

Latest Linekin Bay

Here's the Linekin Bay module at the Narrow Gauge Show. The latest addition was the ramp to the floating dock where the steam launch is docked and some details on that dock.
Behind it is the Monson Junction module, built by Tom and Bob. Bob has some excellent Bangor and Aroostook standard HO equipment at the interchange. Look for Bob's articles on modeling Maine NG passenger equipment appearing in RMC and/or the 2008 On30 Annual.
As always click on the photos to view a larger version.

Thursday, March 6, 2008


Here's a close up of Terry's tug boat that also shows the ball signal on Linekin Bay. Terry did a great job on building this from the Model Shipways kit. It's a wooden-hulled steam tug which fits the era of I model. It was only a visitor on the module. The ball signal is based on the prototypes used though out New England and specifically on two Maine narrow gauge railroads: the Wiscasset, Waterville & Farmington and the Sandy River & Rangeley Lakes. It is functional, being actuated Switchmaster style switch machine by a toggle switch on the fascia. The construction was written up in the Maine 2 Foot Quarterly, Spring 2004 issue. There are plans to added a stationery decoder for actuation by DCC.

Thursday, February 28, 2008

Old Photo

Here's an old photo of Linekin Bay from 2006 showing an overview. Terry Davis' excellent tug boat model is on the left side of the harbor. It's mounted on a plank so that's why it looks like a barge. I poured Envirotex for water and added a floating dock in mid 2007 so it has changed a bit.

Tuesday, November 13, 2007

Linekin Bay Module


Here's a close up of my Linekin Bay module. It has an 11 inch radius loop with the Linekin Bay yard/wharf on the front left corner and the Boothbay Harbor yard/wharf on the rear right corner. It meets the HOn30 module standards.
In the Boothbay Harbor yard is a manual turn table like the one Bob Hayden built using a head phone jack in an old article in Model Railroader. The ball signal can be raised and lower using a toggle switch new to the panel.
The module has 5 cabs/electrical blocks though command control looks like a possibility. The water is Envirotex. Waves will be added soon with a Woodland Scenics product.


Here's another shot of the modules from the right end. The scenery is not 100%. I have more details, grass and dirt to add.
I'll put a small plug in for the Minibunch, a group of narrow gauge modelers in the Midwest. They put on this meet. If you're interested check out www.narrowtracks.com/minibunch for meet schedules and news letters.
I also learned that Funaro & Camerlengo has an HOn30 Davenport shell kit out. I think you have to order it direct. I saw one at this meet but it does not appear to be on the website.

Monday, November 12, 2007

First Photo


At left are 5 of the modules from our group. Mine is the closest one. It is a free-lanced Maine Harbor scene with yards on either side of the harbor. It's been about 5 years in the making and is about 80% complete.